

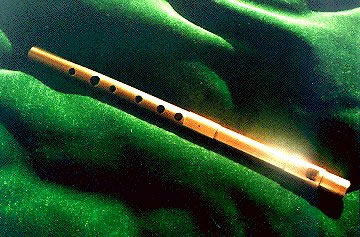
How To Make A Penny Whistle Out Of Wood
Instructions for making a copper pennywhistle in the key of D
This detail is presented here courtesy of Kim Fulton-Bennett. Additional information on pennywhistles, instructions on how to make music with these whistles, their care and feeding, and adjusting their tone/tuning are available on his Spider web site.
What Y'all Will Need
You can make a fine whistle with just simple hand tools and materials that you can purchase at whatsoever hardware store!
Tools
- A ruler marked in cm and mm, equally well as inches.
- Electric mitt drill or drill press.
- Drill bits in 1/32" (0.75 mm) increments.
- Sand newspaper (120- to 220-grit).
- Minor flat or triangular file less than ane/4" (6-seven mm) wide.
- Large flat-sided metal file near ane 1/4" (3 cm) wide.
- Rat-tail (cylindrical) file almost ane/4" (6-7 mm) diameter.
- Flat-bladed screwdriver with blade near 1/iv" (half dozen-seven mm) wide.
- Sharp metal punch for setting holes for drilling (a large pointed steel screw or commodities will as well work).
- Steel bar with flat stop about 1/4" (half dozen-7 mm) square.
- Hack-saw with a metal-cutting blade.
- Chromatic electronic tuner or (for those with a skilful ear) electric keyboard. You tin try to tune the whistle to another wind instrument, but I don't recommend it because you lot can't play both instruments at once to hear the beats when notes are out of tune.
- Optional but recommended: Table vice (handy for holding the piping-be sure to add together padding to the metal grips then yous don't scratch the copper).
- Optional but recommended: Pipe cutter (an inexpensive hand tool that gives a nice, straight end to the pipe).
Materials
- 1/2" copper plumbing pipe (Type Chiliad in the U.S.). Y'all just demand 12-inches (30 cm) for a whistle, only you might want to buy two or iii times this much, just in case.
- Copper connector (sleeve) used to bring together ii lengths of ane/2" copper piping (utilize the kind of connector that has a "stop" hammered into heart of the connector; my measurements take this into account).
- 5/8" Hardwood doweling: a 12-inch length is enough. (Become nine/16" dowel instead, if you lot can observe it).
- Two-office epoxy resin (having the consistency of honey, condom for putting in your oral fissure when dry).
- Optional: Can of spray lacquer.
Conventions and Notes
- In these instructions, "upward" refers to the end of the whistle or fipple closest to your mouth (while y'all are playing). "Down" refers to the end closest to your feet. "Front" refers to the side of the whistle with the fipple and finger holes. "Dorsum" refers to the side without holes.
- You might be able to use metric-sized copper piping instead of standard U.Due south. 1/two" piping, but all the other dimensions will probably modify a bit.
- I sincerely apologize for my "unitary schizophrenia" (there'due south an oxymoron!). My tools are all sized in "English" units, but I prefer to use metric units for all my distance measurements considering information technology is easier to scale them upward or downwardly to build whistles in dissimilar keys.
- Whenever I file, sand, or polish copper, I habiliment a grit mask. I take establish that fine copper dust dust or powder irritates my throat and lungs. Y'all probably don't want to consume it either. Nevertheless, I believe the amount of copper y'all ingest from playing a finished whistle is minimal (please let me know me if I'm incorrect!).
Making the Fipple
NOTE: The fipple is the hardest part of the pennywhistle to make. I often make more fipples than I need, and stop up throwing out some of them because I'thousand not happy with their sound...
Cut the Pipe
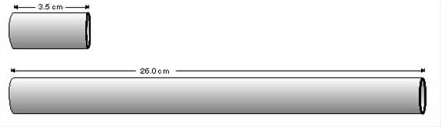
- Mensurate and cut off a 3.v-cm length of pipe. This volition exist the fipple. Use the piping cutter if y'all have 1.
Notation: the sharp ends of the cut piping tin can slice your fingers, so caution is advised. - Cut a second slice of pipage 26 cm long. This will be the body of the whistle.
- Deburr the ends of the pipes (use pipage cutter tool). And so smooth both ends of pipe using first the wide flat file and then sand paper.
Attaching the Sleeve
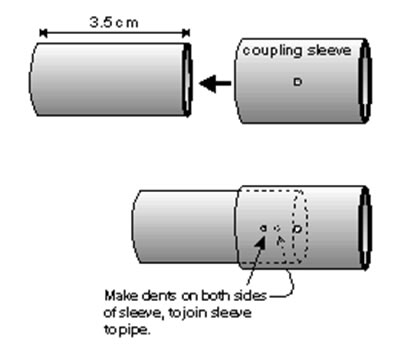
- Slide the sleeve onto the 3.five-cm length of pipe.
- Use the punch to make a dent in each side of the sleeve to secure it to the piping.
Cutting the Fipple Hole
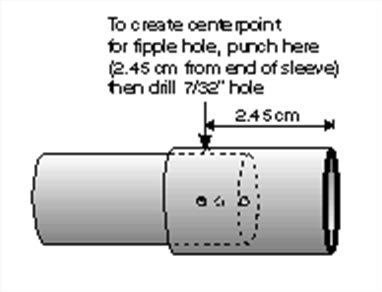
- Measure up two.45 cm from the gratuitous end of the sleeve and scratch a line with the punch.
- Use the punch to create a paring on this line. This dent volition exist the heart point for the fipple hole.
- Drill a vii/32" (6mm) pigsty at this spot.
- Use the small file to shape this round hole into a neat rectangle almost 1/4" (0.65 cm) long and 5/16" (vii.5 mm) wide. The lower lip of this hole should be 1.75 cm from the finish of the sleeve (see picture show below).
NOTE: It is important to make all the edges, inside and out, as shine and neat as possible.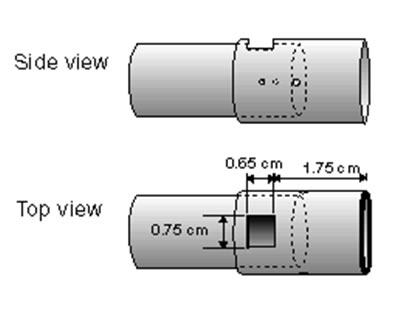 Annotation: For a lower whistle, such as a C, brand the fipple pigsty slightly longer (7 mm); for a higher whistle, make the fipple hole slightly shorter (4-5 mm). In either example, the lower edge of the fipple hole should still be ane.75 cm from the finish of the pipe.
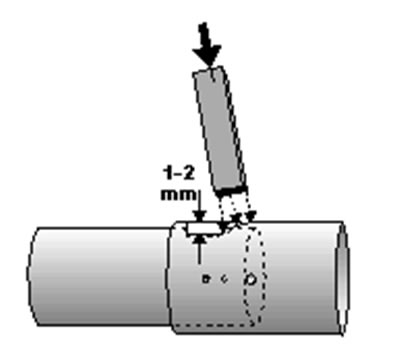
 - Place the flat-tipped metal bar on the lower edge of the fipple hole and tap on information technology with a hammer to bend the copper in virtually about 1-2 mm, as shown below.
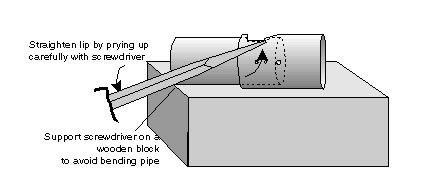
- If the bent-in edge is curved rather than flat, use the screwdriver to reach in from the acme of the fipple and make the edge as flat as possible (see below):
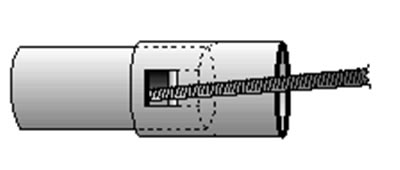
- Use the small file to create a smoothen, beveled "cutting edge" most 2 mm wide on the outer, lower edge of the fipple hole (encounter picture below). This edge must be every bit smooth and straight as you tin can make it.
- Apply sand paper to smoothen the upper stop of the tubing to a higher place the fipple hole, inside and out. This is where your lips will contact the metal, and so you don't want sharp places...
Making the Fipple Plug
- Take the 5/8" hardwood dowel and reduce it's bore to fit snugly inside the copper pipe. The terminal diameter should exist about 9/16" (if you can go 9/16" doweling, please let me know).
Annotation: Ane way to reduce the diameter of the dowel is to use a "poor-man's lathe" ( Warning: This will ruin the bearings in your drill if you do it too much): -
- Spiral a ane/8" woods screw nigh into the exact center of 1 finish of the dowel until but well-nigh 15 mm is left exposed.
- Cut off the caput of the screw with a hack saw.
- Insert the exposed trunk of the spiral into the chuck of an electric mitt drill.
- Concur the hand drill horizontally and run information technology while property fibroid sand newspaper adjacent to the doweling. Make sawdust until the dowel is thin enough so that a piece of pipe (without burrs or lip) fits snugly over the dowel.
- Now cut off a 1 inch (two.5 cm) piece of your (newly lathed) 9/sixteen" dowel and smooth the ends with the apartment file.
- Determine which side of the plug should take the current of air channel cutting into it (I'm not sure which side is best: going "with the grain" gives you a smoother surface, just this side may be more than prone to swelling).
- Employ the large flat file to flatten the side of the dowel where yous will cutting the wind channel. The flattened expanse should be trapezoidal: about 9 mm wide at i end and about vii.5 mm wide at the other finish of the dowel (see picture below).
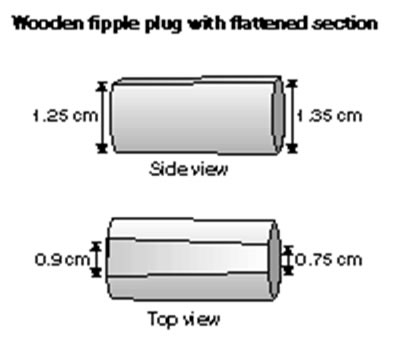
- Use the small file to cut a channel into this flattened surface. This channel should be about 2 mm deep at the wide (upper) end and 1+ mm deep at the narrow (lower) end (see picture below). Brand sure the surfaces and sides of this aqueduct are as polish and flat as possible.

- (optional) Seal the wind channel and lower end of the fipple plug with epoxy or some other difficult, waterproof sealant (I'one thousand not sure if this makes much of a difference).
Mounting and Adjusting the Fipple
- Insert the plug into the finish of the pipe above the fipple pigsty. The narrow, shallow stop of the channel should be pointed toward the fipple hole. Sight through the channel to make sure that the lower end of the aqueduct is parallel to the lower border of the fipple hole. Slide the plug into the piping until the lower cease of the plug is even with (straight beneath) the upper edge of the fipple hole (see flick beneath).
Note: If the plug will not stay put, employ a pocket-size slice of paper as a shim. Fold it if necessary and insert it along the back of the plug to keep information technology from sliding.
- At this indicate, you lot demand to effort out the fipple to see how information technology sounds when attached to the body of the whistle. Slide the fipple (with plug) onto 1 terminate of the 26-cm length of pipe you cut earlier.
- Wipe the dust off the fipple, and then blow into the terminate. You lot should get a clean, if slightly weak annotation (roughly D 1 octave above center C). The point here is non to check the tuning of the note, simply to exam the timbre of the fipple--whether it makes a articulate tone or a blatant one.
- If you lot're happy with the tone produced, continue to footstep 5 below. If you desire to try adjusting the sound, here are some suggestions (this is art, not science):
Annotation: Some of these adjustments are irreversible: if you suit also far, you will have to start over, and create an entirely new fipple.- If the note is too breathy, some air is missing the lower edge of the fipple pigsty. Try one of the post-obit:
- Slide the fipple plug well-nigh 0.5 mm toward the fipple hole. (If you go also far, just push button the plug back out and endeavour once again.)
- Look down through the wind channel. The lower stop of the channel should line up with with the bent-in edge of the fipple pigsty. If can encounter a broad gap betwixt the 2, you can try bending the lower edge of the fipple hole down slightly (this is catchy!). You can as well try making a new plug with a shallower aqueduct.
- If the note tends to "interruption" and go into the upper octave rather than the lower octave, try ane of the following:
- Slide the fipple plug upward well-nigh 0.5 mm (abroad from the fipple pigsty).
- Endeavour deepening the entire aqueduct in the fipple plug slightly (say: 0.5 mm).
- Try bending the lower edge of the fipple hole upwards with a screwdriver, so smooth the border as necessary.
- If the note has skilful tone, but is not loud enough, try 1 of the post-obit:
- Deepen and/or widen the upper end of the channel in the fipple plug. Make certain all surfaces are polish and even.
- Widen the fipple hole slightly with a modest file (piece of work on both sides). Be careful non to make the hole too broad or the whistle will get blatant.
- If the note is too breathy, some air is missing the lower edge of the fipple pigsty. Try one of the post-obit:
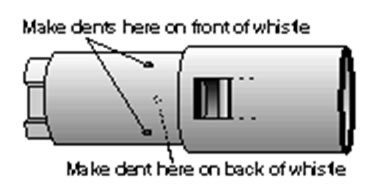
- When you are happy with the audio of the fipple and you are sure the fipple plug is in the correct location, secure the plug by denting the copper pipe around the plug using a punch. I usually make iii dents: two dents five mm to a higher place and to either side of the fipple hole and a third dent on the back of the fipple, virtually 5 mm higher up the end of the plug (run across picture below).
 Annotation: This method works much better than gum, which will not stand up to differential expansion and wrinkle of the forest and copper.
Shaping the Mouthpiece (the part of the fipple that goes in your oral fissure)
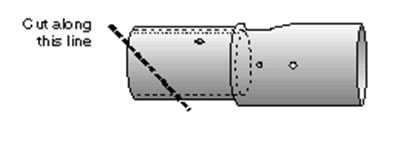
- Place the fipple in a vice and cutting the exposed terminate of the dowel off flush with the end of the copper pipe.
- Clean out the upper stop of the channel in the fipple plug so that you can clearly meet its lower edge.
- Utilise a hacksaw to cut off a triangular section of the pipe and dowel. Starting time the cutting at the end of the fipple, with the hacksaw bract parallel to and about i-2 mm below the lower edge of the wind channel. Every bit soon equally you lot accept a cut a small-scale slot that will proceed the blade from slipping, tilt the hacksaw bract to cutting downward at almost 45 degrees (see beneath).
- Smooth the cutting surface (wood and copper) and the outer edge of the pipe using first the large flat file, then the sandpaper.
- Accident off all loose dust and clear out the mouthpiece again.
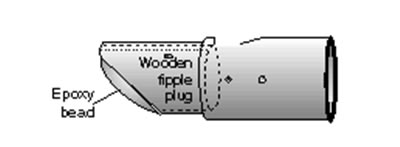
- Mix a proficient two-part epoxy and spread it over the exposed wooden terminate of the fipple (and the copper around the edges). In choosing the epoxy, retrieve that this stuff, when hardened, will be going into your oral fissure. The epoxy should exist the consistency of dear (and is most as easy to control). You desire to use plenty and so that it will mound up, creating a squeamish, smooth surface, but not so much that it volition menstruation off the wood into the mouthpiece or down the sides of the fipple (see below).
- Ready the fipple so that that the wooden surface is level as possible and permit the epoxy harden overnight. If a footling epoxy flows onto the sides of the fipple yous can scrap it off with a screwdriver.
- Your fipple is now complete! (except for the polishing).
Making the Trunk
- Attach your fipple to the end of the 26-cm length of pipe and blow gently and steadily. Once the copper pipe has warmed up to your breath, compare the note with a tuner or electronic keyboard. It should be a D, 1 octave in a higher place middle C.
- If your D is in tune, great! Continue to step 3 below.
- If the whistle is a flake flat, you need to shorten the principal tube a picayune at a time, until information technology comes into tune.
- If the whistle is merely a little scrap sharp, try pulling the long tube out from the fipple slightly. If y'all can bring it into melody without pulling information technology out too far, brand a mark on the primary tube showing how far out it should be for correct tuning. Each time y'all check tuning, make sure the fipple is slid out to this same spot.
Annotation: If the fipple won't stay in i identify because the sleeve is loose, cover the sleeve with a cloth and tap on it with a hammer to put information technology slightly out of round. This should make it concur more tightly onto the primary pipe. - If the whistle is way sharp, it probably wants to be an E-flat whistle instead of a D whistle. If you want a D whistle, cut a new (longer!) piece of copper pipage. If you desire an Eastward-flat whistle, go along cutting off short pieces until you go a depression note of E-apartment. And so use the hole ratios below to effigy out where the holes should go (the hole sizes may change also... remember to start pocket-sized).
- Using a pencil and ruler, draw a straight line upwards the forepart of the body of the whistle (or use an existing striation in the copper).
- Use the ruler and pencil to make marks forth the line at the post-obit distances from the lesser of the whistle:
Note Hole Distance Proportion Bore E Hole 1 4.4 cm 0.15 iii/16" F Hole 2 vi.6 cm 0.25 9/32" Thousand Pigsty 3 viii.3 cm 0.31 1/eight" A Pigsty 4 10.7 cm 0.twoscore 7/32" B Pigsty 5 13.0 cm 0.49 one/four" C Hole half dozen 14.8 cm 0.56 1/4" NOTES:
ane) The ratio labeled "Proportion" in this tabular array is the distance from the bottom of the whistle to the heart of the finger pigsty divided by the full acoustic length of the whistle. (In this case, the acoustic length is the distance from the bottom of the whistle to the lower edge of the fipple hole, or 26.5 cm).
2) This table lists just one possible set of hole positions and sizes. Many different position/size combinations are possible. Encounter the Notes on Tuning for suggestions on how to accommodate these factors to create your own hole arrangements.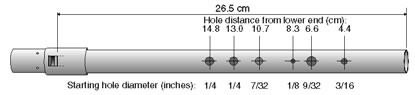
- Apply the punch to make pilot "dents" to guide the drill bit at each of these locations.
- At Hole 1 (the mark closest to the lesser of the whistle), drill a hole slightly (near 1/16") smaller than the size shown in the table above under "Diameter" Use the rattail file to clean up whatsoever burrs from inside and outside of the hole.
- Blow into the whistle with the hole covered. This should give you your depression D (in tune). Now lift your finger and play the new annotation (low E). Check it against your tuning standard. It will probably exist a fleck flat. If so, cull a drill flake 1/32" larger and open up the hole slightly. Check the note over again. Remember that at that place is no easy way to make a pigsty smaller if you open information technology up too far (creating a note that is likewise abrupt). Come across some notes on tuning below for additional details.
- When the notation in the low octave is in tune, try playing the aforementioned note i octave up, and check the tuning of this note equally well.
- Repeat this process for each of the holes, starting at the lower end of the whistle and working your way up to the pinnacle.
Some notes on tuning:
- Always warm up the whistle before tuning it by bravado through it for a few minutes.
- Try to apply the aforementioned breath pressure for all notes, then that a note does non seem sharper or flatter just because you are blowing differently. This is particularly tricky for the highest notes (loftier A and above), which oft have to exist blown harder to keep them from beingness apartment.
- Attempt each note in both the low and high octave. In some cases you may have to compromise on pigsty size and placement.
- For the college notes (A and B especially), you will have to work out a compromise because they will play rather flat in the high octave unless you open them up a scrap wider than would exist optimum for the lower octave. This may be something that might be solved by optimizing the pigsty placement, but I have not all the same constitute whatever placement/hole size combination that will completely eliminate the problem.
- The tone of whatever given note is controlled primarily past the size of the uppermost open pigsty and it's position on the whistle. It is also affected by all the open up (or closed) holes below it. This is why you e'er drill holes and tune the notes starting at the bottom of the whistle.
- Enlarging a hole makes the note sharper. Drilling a smaller hole creates a flatter note.
- Moving a hole upward the whistle makes the annotation sharper. Moving a hole down makes the annotation flatter.
- Given the above, if you lot want to make a whistle with larger holes, you volition have to motility all the holes down a bit. This applies to private holes too--if you move a hole down, yous have to make it larger to go the correct notation.
- As well given the to a higher place, if you want to make a whistle with smaller holes, yous volition take to motility all the holes up a bit. This applies to private holes as well--if you move a hole up, you accept to go far smaller to go the correct note.
- Smaller finger holes brand for a more than quick, responsive whistle, but they too brand a quieter whistle. Conversely, larger finger holes make a louder whistle (and perhaps ane with a mellower tone), merely it won't feel as "quick" or "lively."
- There is no way to utilize hole size and placement to compensate for a whistle whose torso is cutting also brusk or too long--the tonic note will e'er exist off.
- If you desire to brand a hole slightly larger, but don't have a drill scrap of the next size upwards, you tin can apply your existing bit to widen the hole (sideways or up the whistle). Withal, the resulting holes won't look as neat, and you need to make certain you can still easily cover them with your fingers.
- When you take all made and tuned all half-dozen holes, employ the rat-tail file to clean up any remaining burrs from within and exterior the whistle. Then take a modest slice of sandpaper and wrap information technology into the shape of a small cone (about the size of a pencil tip). Work this effectually in each of the finger holes to shine them out, until they feel good on your fingers. Outset with 80- or 120-grit and move upwards to 180- or 220-grit.
Finishing the Whistle
After you accept finished all tuning and shaping, you lot are ready to make the whistle smooth. I highly recommend using a Grit MASK for this phase of the process, even if y'all haven't used one for previous steps.
- Get-go by buffing the unabridged whistle with a actress-fine-textured green plastic scouring pad. Use this pad to piece of work out whatsoever gouges or sandpaper scratches and to exercise final smoothing around the border of the finger holes. You can piece of work on the fipple too, merely stay away from the epoxy-coated area, which scratches easily.
NOTE: You lot can buff either parallel to the long-dimension of the whistle or at right angles to it (past twisting the pipe within the pad), just not both. You become a different sheen depending which direction you lot vitrify, and you tin determine which yous like better...) - Now buff the entire whistle again using actress fine (000) steel wool. Buff in the same direction that you lot used with the plastic pad, and stay away from the epoxy bead on the mouthpiece. When you are done, yous should take a really nice shine. While you are doing this concluding polishing, wear gloves or concord the whistle in a textile to avoid getting fingerprints on it. When yous are washed buffing, wipe off the entire whistle with a clean newspaper towel or cloth.
- To proceed the shine for more than a day is really tough! I am currently using four coats of spray lacquer. This stuff is nasty, and then make sure you have good ventilation. The air temperature also needs to be warm and not besides boiling... I also suggest masking off the part of the fipple that goes in your mouth, so that you don't become lacquer on information technology.
- Another approach is to utilize several coats of wax, such as Minwax wood stop. I apply at least three coats, letting each coat dry (almost ten-fifteen min) then buffing it out with a soft fabric before applying the next coat. Practise non wax the function of the fipple that goes in your mouth. The wax coating eventually wears through, especially where your fingers contact the whistle. At that point, you can vitrify it out once again (if necessary) and wax it again.
I have tried other coatings, but take found that they are much more of a hassle and accept longer to dry. Fifty-fifty the lacquer will wearable off with fourth dimension. With the epoxy I accept had adhesion issues. Other waxes, such equally car waxes, may also work just I haven't washed much long-term testing with these.
Another culling is to allow the copper darken naturally. I rather similar the look of copper afterward it darkens. I've also been experimenting with various compounds to create reddish or greenish patinas.
Congratulations! You accept created your own copper pennywhistle. Fifty-fifty if information technology is not perfect, it has your spirit in it... and yous can always try once again. Some other reward of making your own whistles is that you can make them in whatsoever primal, depending on the music you are playing.

How To Make A Penny Whistle Out Of Wood,
Source: https://www.copper.org/consumers/copperhome/DIY/cu_pennywhistle.html
Posted by: meiklecatell.blogspot.com
0 Response to "How To Make A Penny Whistle Out Of Wood"
Post a Comment